Altair-Duino Pro
- General
- Project Diary
- Front Panel Switches
- Instructions
- Communicating via ...
- Configuration, Reset ...
- Displaying, mounting & booting a MITS (88-DCDD) disk drive
- Displaying, mounting & booting a MITS (88-HDSK) hard disk drive
- Serial connection for file exchange
... using Kermit, PCGET/PCPUT and PIP - Disk formats (8" & 5.25")
- Information
- Links
Instructions
If you come from the DOS and CP/M "keyboard world", the handling of the switches takes a lot of getting used to at first. Especially at the beginning, you always forget to reset the switches!
At the beginning, you should always have a printout of David Hansel's manual next to you on your desk.
# Communication with ...
You have three options to communicate with the Altair-Duino. All necessary connectors are located on the back of the Altair-Duino, on the I/O expansion board.
Which connection you use depends on your personal preferences. I would start with the USB port. I currently use option (3) in conjunction with the second serial port (DB9) for data transfer with TeraTerm/Windows 10.
- USB port
- Serial port
- VT-100 emulator
(1) USB Port
{USB mini connector}By default the Altair-Duino is set up to communicate by the USB port (115.200, 8N1). The power switch is not used. Power is also supplied via USB.
This connection or usage of the Altair-Duino has the decisive advantage that you can use modern hardware and software (macOS, Windows 10 or Linux) in connection with a direct data exchange with XMODEM. I use TeraTerm with macOS Catalina & Parallels Desktop and Windows 10.
For example, you can send and receive complete images (FD, HD) from the SD card using the FILE MANAGER in the CONFIGURATION MENU. A backup is done in a few seconds or minutes.
(2) Serial Port
{DB9 serial connector}
switch up: ........ SW1 / D1
switch up and hold: DEPOSIT
turn on: .......... Altair-Duino
release: .......... DEPOSIT
This will cause the Altair-Duino to load the configuration #2 from STORAGE.DAT from the SD card. You have to use the external power supply and the power switch.
Use an original serial cable (no cable crossing). Do NOT use a null modem cable!
(3) VT-100 Emulator
{VGA & PS2 keyboard connectors }
switch up: ........ SW0 / D0
switch up and hold: DEPOSIT
turn on: .......... Altair-Duino
release: .......... DEPOSIT
This will cause the Altair-Duino to load the configuration #1 from STORAGE.DAT from the SD card. You have to use the external power supply and the power switch. You need a VGA Monitor and a PS2 keyboard.
This option is my favourite because I can use the Altair Duino as a stand-alone computer with keyboard and monitor. The exchange of data and files is also done classically via a serial cable (2SIO port 2, DB9 plug) and XMODEM.
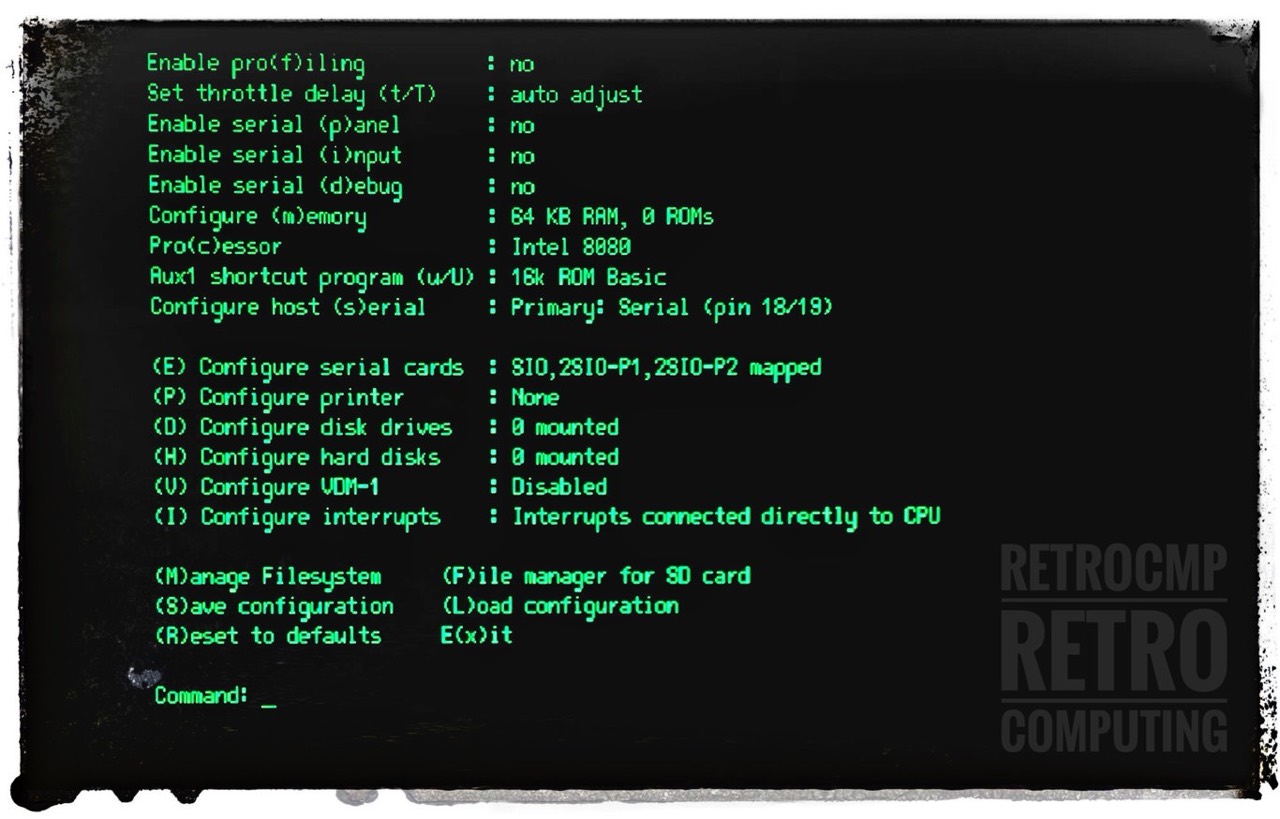
# Configuration, Reset, ...
CONFIGURATION MENU
This menu does NOT exist on the original Altair 8800, but only on the simulator!
switch up: ........ STOP and then AUX1

Enable pro(f)iling          : no
Set throttle delay (t/T)    : auto adjust
Enable serial (p)anel       : no
Enable serial (i)nput       : no
Enable serial (d)ebug       : no
Configure (m)emory          : 64 KB RAM, 0 ROMs
Pro(c)essor                 : Intel 8080
Aux1 shortcut program (u/U) : 16k ROM Basic
Configure host (s)erial     : Primary: USB Programming Port

(E) Configure serial cards  : SIO,2SIO-P1 mapped
(P) Configure printer       : None
(D) Configure disk drives   : 0 mounted
(H) Configure hard disks    : 0 mounted
(V) Configure VDM-1         : Disabled
(I) Configure interrupts    : Interrupts connected directly to CPU

(M)anage Filesystem     (F)ile manager for SD card
(S)ave configuration    (L)oad configuration
(R)eset to defaults     E(x)it

Command:
(M)anage Filesystem
Here you can view your saved configurations.
(F)ile manager for SD card
Here you can view your floppy disk and hard disk images and exchange them with XMODEM (in total).
HARD RESET - Before You do Something New
switch up: ........ STOP & RESET
# Making a Serial Connection for Data and File Transfer
I have already briefly described the topic of file transfer between Altair-Duino and Windows 10, for example, above.
If you use the above-mentioned options (1) and (2), i.e. the terminal connections, then you can also exchange data via this connection without any further settings. However, if you use option (3) with the VT-100 emulator, then you still have to make a few settings in the CONFIGURATION MENU.
switch up: ........ STOP and then AUX1
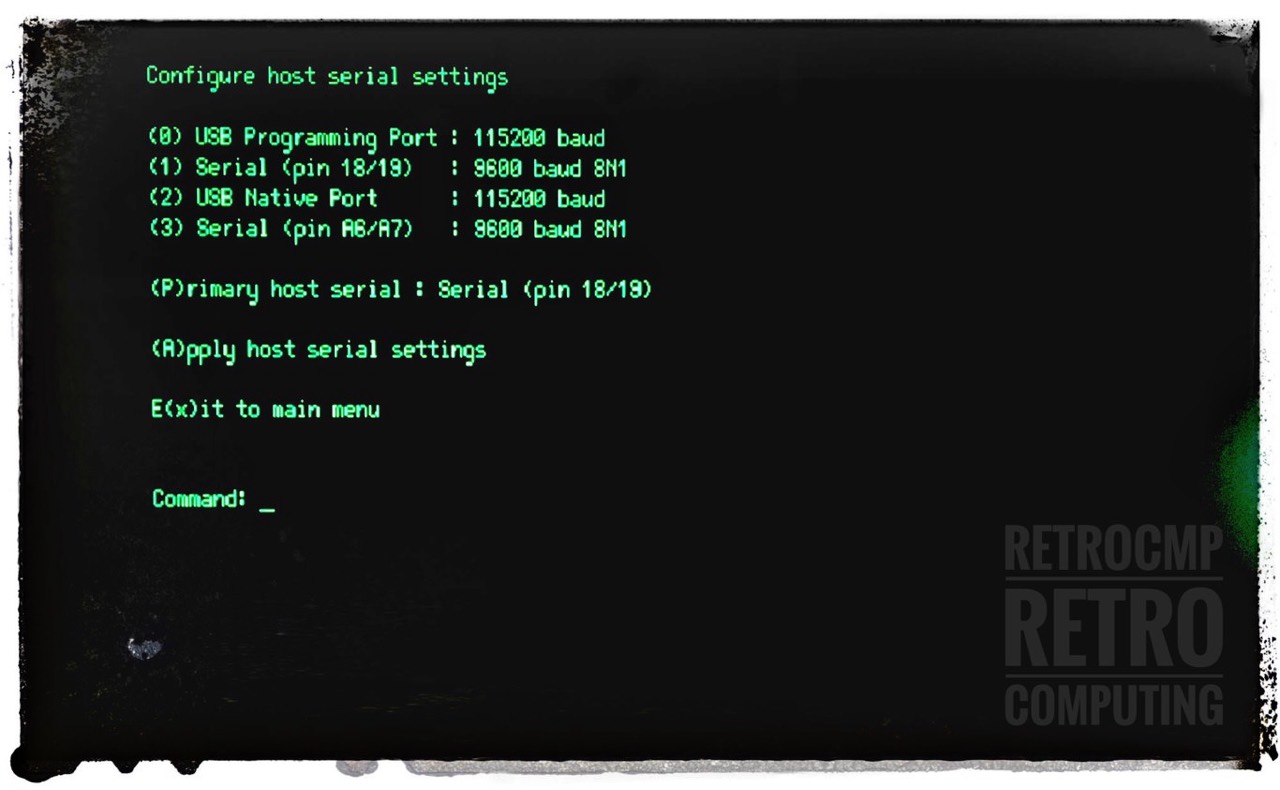

Under item (4) you must map the connection „Serial (pin A6/A7)“ on „2SIO port 2“ and set the baud rate to 9600. The classic DB9 serial port on the back of the Altair-Duino is connected to pins A6/A7 of the Arduino Duo (use: 9600, 8N1).
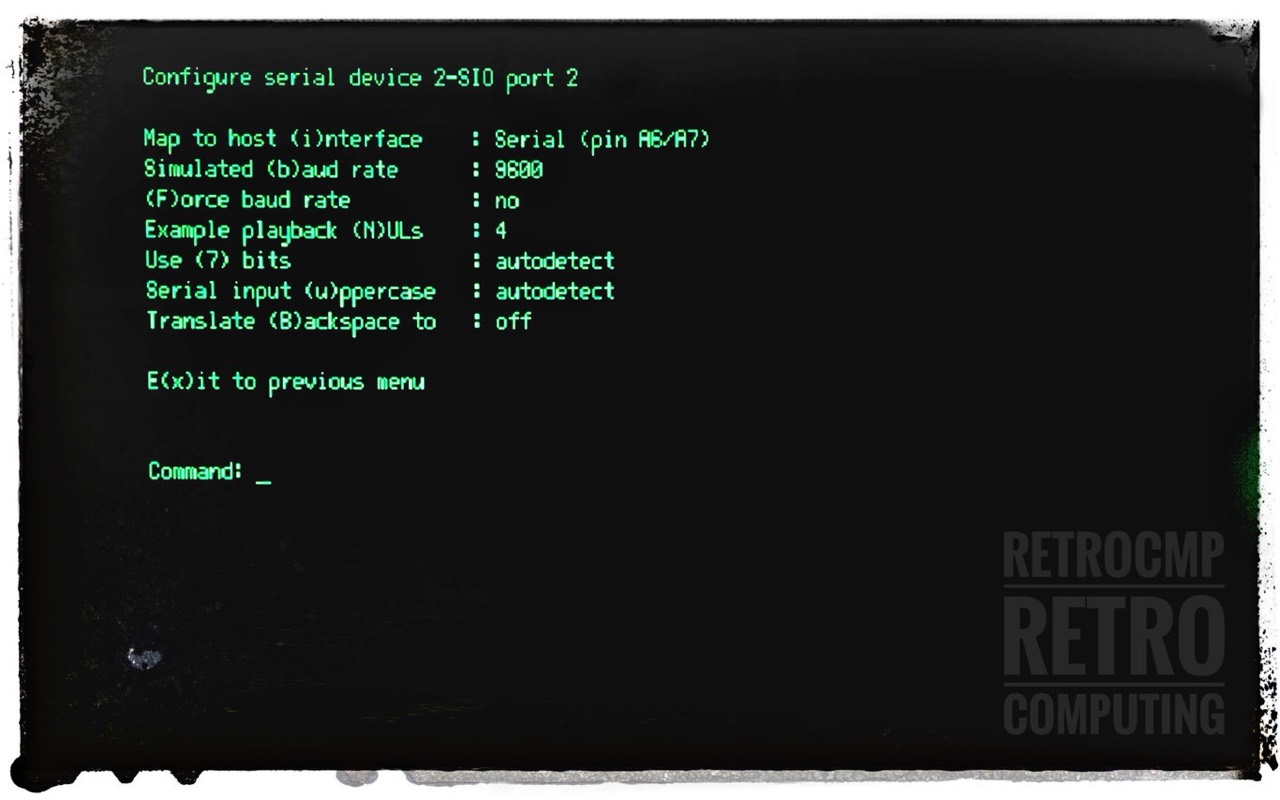
With this setting, you can, for example, exchange individual files in a mounted diskette drive with PCPUT and PCGET.
With this setting, however, you can NOT transfer entire images in the FILE MANAGER. This is only possible with the serial or USB terminal connection.
Using Kermit 4.11 for CP/M-80
There is not much to say, Kermit works perfectly.
Using PCGET & PCPUT
These programs make it easy to load a file from the PC into a CP/M system (PCGET) or write a file from a CP/M system to a PC (PCPUT). The XMODEM protocol is used for file transfer. The program uses 2SIO port A by default, however, if the command line is followed by a B, then file transfer takes place over the 2SIO’s port B.
Source: https://deramp.com/downloads/altair/software/8_inch_floppy/CPM/CPM%202.2/PCGET%20and%20PCPUT/ReadMe.pdf
There is really nothing more to be said about these programs. Read the manual, see below.
On the Move With PIP
Question: What was first there? The hen or the egg? Or, how do I transfer files on CP/M if there is no corresponding software such as KERMIT, XM or PCGET on the receiving side? Just go with PIP to copy a Intel HEX version of PCGET!
{On the Altair-Duino:}

A>PIP PCGET.HEX=UR2:[H]

or

A>PIP PCGET.HEX=CON:[H]

{Windows 10 with TeraTerm}

Send PCGET.HEX using simple ASCII transfer
(SETUP: set transmit delay to 10 msec/char)
(Menu FILE / SEND FILE)
After the transfer type CTRL-Z to signal
PIP END-OF-FILE (EOF).

{On the Altair-Duino:}

A>LOAD PCGET

FIRST ADDRESS 0100
LAST ADDRESS  0400
BYTES READ    0301
RECORDS WRITTEN 07

... done
The only difficulty is to select the right DEVICE (IOBYTE assignment). By default it would be CON, but specifically with the Altair-Duino it is UR2. UR2 is the RDR (input) device on 2SIO port 2.
But UR2 only if you are using option (3) - VT100 Emulator - and are connected to the Windows PC with the serial DB9 cable.
With option (2), serial connection via DB9, you have to use CON. Don't get confused. Search the Internet for the keywords IOBYTE and CP/M.
# Displaying, mounting & booting a MITS (88-DCDD) disk drive
... displaying ...
SW15 to SW0: 0 001 000 000 000 000
AUX2 down

0001)  DISK01.DSK: CP/M (63k)
0010)  DISK02.DSK: ALTAIR DOS 1.0
0011)  DISK03.DSK: ALTAIR Disk Basic
0100)  DISK04.DSK: ALTAIR Disk Basic programs
0101)  DISK05.DSK: Games (CP/M programs)
0110)  DISK06.DSK: SuperCalc II (CP/M program)
0111)  DISK07.DSK: WordStar (CP/M program)
1000)  DISK08.DSK: Zork (CP/M game)
... and others
... mounting ...
nnnn: 4-bit number selecting the drive

             0 001 nnn nDD DDD DDD
SW15 to SW0: 0 001 000 000 001 000
AUX2 down

[mounted disk image 'DISK08.DSK:
Zork (CP/M game)' in drive 0]

... or ...

             0 001 nnn nDD DDD DDD
SW15 to SW0: 0 001 000 100 000 111
AUX2 down

[mounted disk image 'DISK07.DSK:
WordStar (CP/M program)' in drive 1]
... booting ...
SW15 to SW0: 0 000 000 000 001 000
AUX1 down

[Running Disk boot ROM]


62K CP/M
Version 2.2mits (07/28/80)
Copyright 1980 by Burcon Inc.
... umounting ...
nnnn: 4-bit number selecting the drive

             0 001 nnn nDD DDD DDD
SW15 to SW0: 0 001 000 000 001 000
AUX2 up

[unmounted drive 0]
# Displaying, mounting & booting a MITS (88-HDSK) hard disk drive
... displaying ...
SW15 to SW0: 0 011 000 000 000 000
AUX2 down

Available hard disk images:
---------------------------------------------
0001) HDSK01.DSK: Altair Hard Disk BASIC
0010) HDSK02.DSK: Altair Accounting System
0011) HDSK03.DSK: Mike Douglas' 88-HDSK CP/M
0100) HDSK04.DSK: CP/M Infocom Adventures

---------------------------------------------
... mounting ... Mike Douglas' 88-HDSK CP/M
nnnn: 4-bit number selecting the drive

             0 001 nnn nDD DDD DDD
SW15 to SW0: 0 011 000 000 000 011
AUX2 down

[mounted hard disk image 'HDSK03.DSK:
Mike Douglas' 88-HDSK CP/M' in platter 0 of unit 1]
... booting ... Mike Douglas' 88-HDSK CP/M
SW15 to SW0: 0 000 000 000 001 110
AUX1 down

[Running Hard disk boot ROM]

HDBL 2.00
LOADING FROM 0

63K CP/M 2.2b ver 1.5
For MITS 88-HDSK

A>
... unmounting ... Mike Douglas' 88-HDSK CP/M
nnnn: 4-bit number selecting the drive

             0 001 nnn nDD DDD DDD
SW15 to SW0: 0 011 000 000 000 011
AUX2 up

[unmounted platter 0 of unit 1]
Information
- Altair-Duino, Altair-Clone, Altair Simulator
- David Hansel: Altair 8800 Simulator (2020, PDF) / This user guide is VERY important.
- The Altair Experience: Altair 8800 Clone: Video Library / Very important is the section (1) with the videos about the front panel. You simply have to go through it!
- Kermit 4.11: for the Altair 8800 (PDF)
- PCGET & PCPUT: for the Altair 8800 (PDF)
- Altair 8800
- MITS: Altair 8800 Operators Manual (1975, PDF)
- Poptronics: Build the Altair 8800 mini computer, part 1 (1975 Jan, PDF)
- Poptronics: Build the Altair 8800 mini computer, part 2 (1975 Feb, PDF)
External Links
- Buy on Tindie: Altair-Duino Pro
- ADWATER & STIR: Homepage / Altair-Duino
- deramp.com: Downloads / Lots of information about hardware and software; programs and images.